Reality Keyer and Fine Tuning
Keyer is the most essential part of any green screen Virtual Studio production. Reality Keyer Sections under Reality Keyer describe steps on how to work with various Keying properties. Reality Keyer is an internal keyer feature in Reality Engine which is one of the world’s most advanced and true-life keyers which provides spectacular results for keying of live camera video input to preserve real environment details such as contact shadows, transparent objects, and sub-pixel details like hair.
Reality Keyer also works with 4:4:4 RGB camera sources. The keyer also supports 3D masks for “force-fill” and “spill bypass” buffers besides garbage masks. These masks enable hybrid virtual studio operation which lets you combine virtual and real environments.
Reality Keyer Node
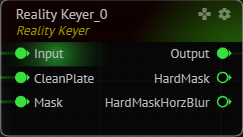
Reality Keyer node is used for image-based keying technology. The pins are:
- Input: This should be either direct or delayed output from
AJAinwhich is the SDI Input - CleanPlate: This can either be a color from
Colornode or distortedRenderoutput ofCycloramanode. - Mask: This can either be a combination of 3D Geometry masks or distorted
Maskoutput ofCycloramanode. - Output: This is the keyed image
Outputof theReality Keyernode. - HardMask: This is the Core Matte view for fine-tuning the keyed image.
- HardMaskHorzBlur: When the lighting, cyclorama background color and camera is optimized, Reality Keyer will only require small adjustments. While working on different modes you can use
Outputproperty of theReality Keyernode as below:
After setting up the clean plate, here is the suggested workflow for fine-tuning Reality Keyer. These are the main steps in the keying process:
- Fine-tuning the Soft and Core Mattes
- Creating a key for the spilled areas
- Screen subtraction and Spill suppression
- Color Correction (optional)
Capturing Cyclorama Projections for Clean Plate
To expect the best result from Reality Keyer which is an Image-Based Keyer, it is important to take a good projection of the cyclorama. It is important to take the wider screenshot as possible like the one below:
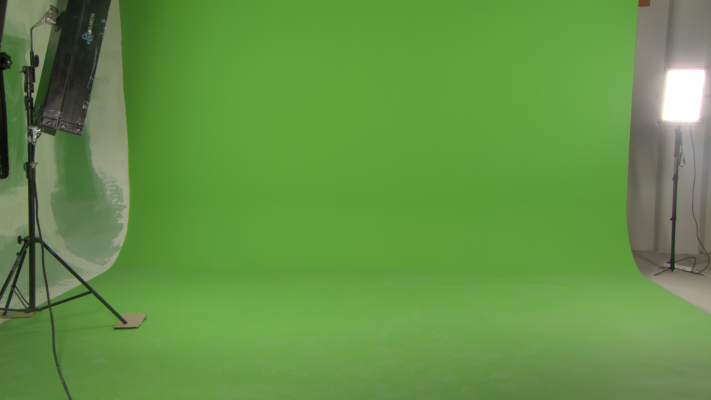
To add a projection of the Cyclorama as the one above, please go to the Functions tab of the Cyclorama node and click AddProjection
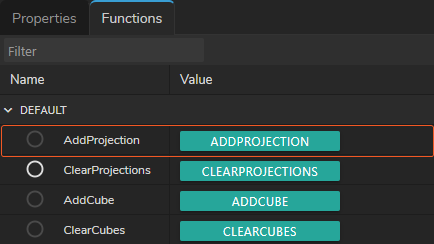
Once you add this projection, this Clean Plate is added to Capture section of the Cyclorama node.
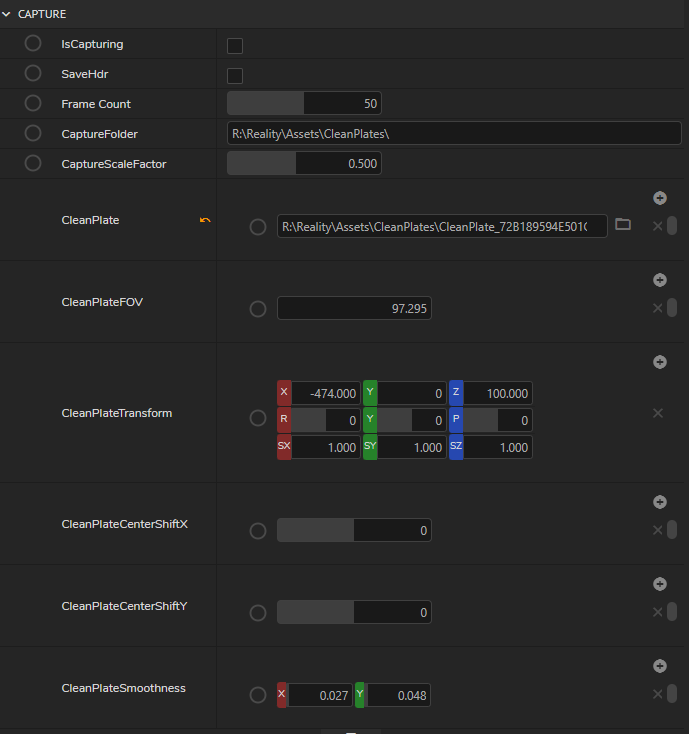
Remember that if the whole of the cyclorama cannot fit in one shot, you should start taking projections from the center and then you can click on AddProjection while you are taking projections of the sides of the Cyclorama and you will see that these projections add as stitching to the shots.
Reality Keyer Properties
Now going over different Output Types, it is time for fine-tuning the Keyer output.
Soft Matte
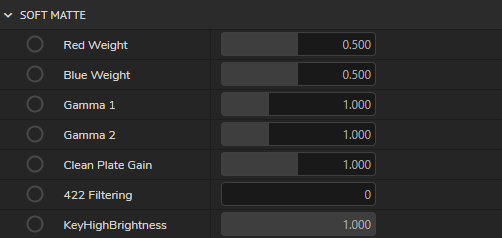
We should first start looking at the result of CombinedSoftMatte. In the final, we want this matte to be soft and provide fine details for the edges of the foreground subject. It is acceptable to have some transparency and/or holes in the middle of the soft matte. Do not try to fill in these holes using soft matte settings, that will be job of the CoreMatte to fill in these holes.
- Choose the
OutputTypeasCombinedSoftMatte. - For an ideal green screen, these weights should be at “0.5”, however in some situations we might need to tweak these values.
- If you adjust
SoftMatteRedWeight, you will expect that those pixels will become pinker. - We combine
SoftMatteGamma1andSoftMatteGamma1which are in opposite directions to work on softness details like shadows. Modifying these values will affect the visibility of the shadows and transparency. - Do not try to compensate all the holes with Soft Matte settings. Try to make edges look good with Soft Matte.
Core Matte
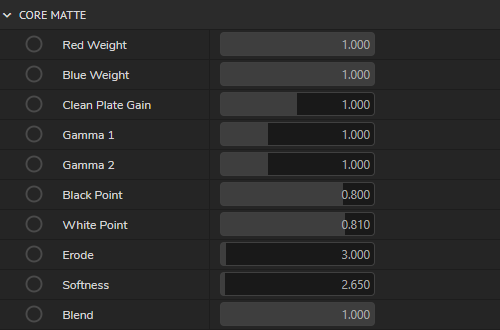
After having a good CombinedSoftMatte, we should look into fine-tuning the hard matte. We can view the hard matte using the CoreMatte viewing mode. This matte's job is to fill in the holes of the CombinedSoftMatte. Since this matte will be harder and provides a harsh matte, we will need to “clip”, “erode” and “soften” it, using the hard-matte controls. While tuning the hard-matte controls, we should aim to not to see any holes or transparencies. We should create a rough matte for the foreground subject, and try to not to include any portion of the green screen cyclorama by more than a few pixels in size.
- Choose the
Output TypeasCoreMatte. - Ideally, you shouldn't use any Core Matte at all. The pixels which reflect green light will go softer or more transparent.
- Any indirect light coming in will make it transparent on Core Matte so please check if the fabric for Cyclorama you are using is not a reflective material.
- The holes in the center of the talent are handled by Core Matte. Make sure that the talent inside the scene has no black points on Core Matte.
- Tune it by clipping the “blacks” and “whites” of the hard matte. You can try to remove any wrong pixels in the green screen by increasing the
CoreMatteBlackPointvalue. You can also fill the holes and transparencies in the foreground subject by loweringCoreMatteWhitePointvalue. - When you need to adjust the hair details, please switch the
Output TypetoShrinkedMatteand modifySoftnessand find the optimum value to show the hair detail.
Spill
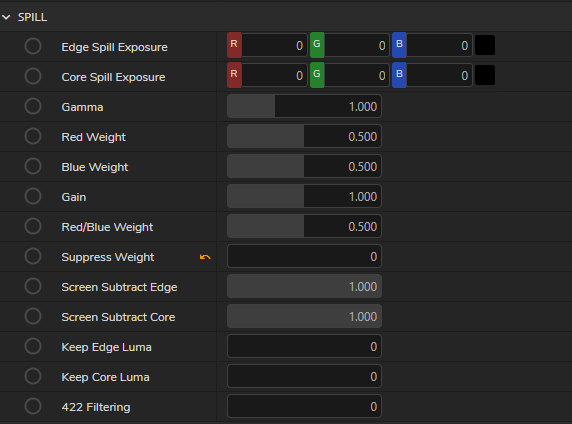
After generating the matte, the keyer needs to suppress for the green colored edges of the subject and the indirect green light reflected off the green screen walls and floor. By looking at the scene you can see the spill and decide how much to manipulate the spill parameters.
- Choose the
Output TypeasSpillMatte. - When
ScreenSubtractEdgeis 1, it means subtracting all the greens from the edges. Likewise,ScreenSubtractCorerefers to subtracting the greens from the core. It is another way of suppressing green reflections and edges. - We can manipulate the
UnPremultGammavalue rather than remodify the Core Matte. This value will also affect the edges` softness. - Do not overuse the
EdgeSpillReplaceColor, you can slightly modify it to match the color of your scene.
Final Matte

Reality Keyer pipeline generates the “Combined Soft Matte” and “Shrinked Core Matte” and then they are combined into the final matte. We can view it using the FinalMatte viewing mode.
- Do very little adjustment to
FinalMatteBlackPointandFinalMatteWhitePointto fill the holes if necessary. It has to be no more than 0.1, if you need to adjust to a value more than this, please consider rearranging the lights, checking the camera sensor and its properties or the color properties of your physical cyclorama. - Use
FinalMatteGammato control the final softness of the matte.
Adding a Color Correction Node
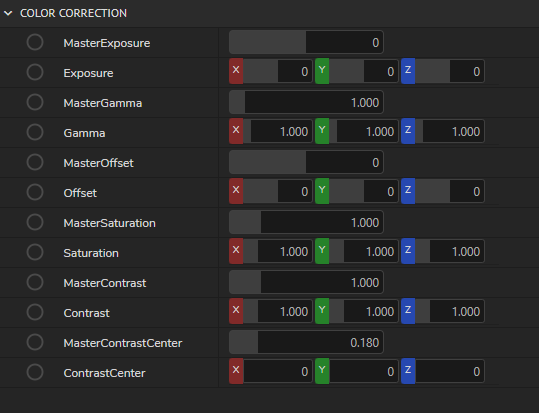
As different sets require different color properties of the talents, to correct the color properties of the talents in the set, you might need to do color correction each time you switch to a different set. Rather than using the Color Correction section in the Reality Keyer node, it is a better practice to add a Color Correction node after Reality Keyer node as shown below: which can also be seen on the templates:

And change only these properties when you switch to a different set:
Other Tips
- If you are using a broadcast camera; check the CLASS setting. You can find detailed information here.
- If you see Black Lines around the talent: You might have a bad sensor on the camera, and also check the camera's sharpness.
- If you see Red Lines around the talent: You might have a bad camera and lens, you can use
DilateRGBAnode's properties to overcome this. - Saturation caused by dirt on the cyclorama will surely affect keying quality as it is a color-difference keyer. Make sure the area is always clean.